

When working on a project, alone or as a team, it’s good practice to use software like Git.
It lets you store your code somewhere other than your computer or a USB stick (not very practical when working with classmates or colleagues), work on files at the same time as other people, and keep a history of every change.
Git belongs to the family of VCS (Version Control Systems), which are designed for collaborative work. It’s also a cornerstone of any DevOps approach.
What is Git?
Git is free, open-source software created by Linus Torvalds, the creator of the Linux kernel.
Git doesn’t rely on a central server, as it uses a distributed, peer-to-peer model. However, it’s very often used with an intermediate server such as Gitlab or Github, which are code hosting services compatible with VCS tools.
A similar tool is Mercurial, although Git remains by far the most widely used.
Benefits of using a VCS
- All file versions are in one place.
- Traceability and a full history of every change.
- Code backed up across several computers/servers.
- Code can be shared publicly or privately.
And many more benefits you’ll discover for yourself as you use it!
Installing Git
Git is available almost everywhere, and installing it couldn’t be simpler:
- go to https://git-scm.com/downloads.
- select your operating system.
- on Linux/Unix, the next steps are explained; on Windows and Mac, the installer does the rest.
Getting started with Git
The first thing to do on your machine is set your username and email address, so the history shows who changed what.
To do so, just run these commands in your terminal:
git config --global user.name "Your_username"
git config --global user.email "your_address@email.com"
You now have two options: start versioning a brand-new project, or existing code. In what follows I’ll use GitLab, but GitHub and Bitbucket work the same way and give you the starter commands to initialise a project.

Versioning a brand-new project
Create an account on GitLab, then click New Project. You’ll see several options; choose “Create Blank Project“.
Here’s what I entered:
project_name : article_safecode
project_slug : article_safecode (generated automatically, but you can edit it)
description : (optional)
visibility_level : your choice: one option makes it visible to everyone, the other only to you and the people you invite.
Tick Initialize repository with a README.
Our project is now initialised and hosted on GitLab, with a single file for now: README.md. This Markdown file provides information about the project (documentation, description, updates, etc.). Our project is in fact a repository.
Now we just need to clone the project to our computer by clicking the clone button, choosing either SSH or HTTPS. I’ll use HTTPS here; to use SSH, just add your public key in the settings.
Cloning creates a folder named after the project, so for me it will be a folder called article_safecode.
git clone https://gitlab.com/thibault/article_safecode.gitI’m then asked for my GitLab username and password:
Cloning into 'article_safecode'...
Username for 'https://gitlab.com':
Password for 'https://thibault@gitlab.com':
remote: Enumerating objects: 3, done.
remote: Counting objects: 100% (3/3), done.
remote: Total 3 (delta 0), reused 0 (delta 0), pack-reused 0
Unpacking objects: 100% (3/3), 223 bytes | 223.00 KiB/s, done.
Versioning existing code
To version existing code with a hosting service, first create the repository on GitLab, but without initialising the README.md.
Since the repository is completely empty, GitLab kindly shows you the commands to run.
The part we’re interested in is Push an existing folder. Locally, I created a folder called article_safecode containing a file named hello_world.txt.
cd existing_folder
git init
git remote add origin https://gitlab.com/thibault/article_safecode.git
git add .
git commit -m "Initial commit"
git push -u origin master
And that’s it! Don’t worry about the commands, we’ll go through them in detail below.
What is git init?
The git init command is fairly self-explanatory: it initialises Git (more precisely, a .git folder in the current directory).
git init
Initialized empty Git repository in /home/thibault/Downloads/article_safecode/.git/
Here’s what the folder it generates contains:
$ tree
.
├── branches
├── config
├── description
├── HEAD
├── hooks
│   ├── applypatch-msg.sample
│   ├── commit-msg.sample
│   ├── fsmonitor-watchman.sample
│   ├── post-update.sample
│   ├── pre-applypatch.sample
│   ├── pre-commit.sample
│   ├── pre-merge-commit.sample
│   ├── prepare-commit-msg.sample
│   ├── pre-push.sample
│   ├── pre-rebase.sample
│   ├── pre-receive.sample
│   └── update.sample
├── info
│   └── exclude
├── objects
│   ├── info
│   └── pack
└── refs
    ├── heads
    └── tags
You only need this command when initialising a repository. If you’re joining an existing project, you won’t need it.
Git remote add origin
Likewise, you only need this command when linking your project to a repository, not when joining a project. It sets the origin to the project URL passed as a parameter.
Git clone
This command clones the remote repository to your machine.
git clone https://gitlab.com/your_username/your_project.gitWhat is git add?
The git add command adds modified files to the staging area, usually followed by a commit message and a push to the GitLab server. The parameter is the file in question.
git add . # adds all modified files in the current directoryIn the previous example, we could also have run:
git add hello_world.txt # stages only this fileTo add several files, list their names one after the other:
git add bye_bye.txt test.txt # you can add several files at once, or one by oneChecking file status with git status
git status # gives you an overview of the local stateExample output:
$ git status
On branch master

No commits yet

Changes to be committed:
  (use "git rm --cached <file>..." to unstage)
	new file:   bye_bye.txt
	new file:   test.txt

Untracked files:
  (use "git add <file>..." to include in what will be committed)
	hello_world.txt
Notice the branch name at the very top, a concept we’ll look at later. For now, there’s only one branch: master.
We can see the files that have been staged but not yet committed (a commit is a change recorded with a message).
Below, the untracked files section lists the files we haven’t added.
Committing changes with git commit
$ git commit -m "add encryption"
[master (root-commit) ed96f08] add encryption
 2 files changed, 0 insertions(+), 0 deletions(-)
 create mode 100644 bye_bye.txt
 create mode 100644 test.txt
This command records the staged changes along with a message. The -m parameter lets you write the message inline; otherwise, your default editor opens so you can write it.
For more information on the parameters:
man git-commitIf we run git status again, the staging area is now empty:
On branch master
Untracked files:
  (use "git add <file>..." to include in what will be committed)
	hello_world.txt

nothing added to commit but untracked files present (use "git add" to track)
If you made a mistake in your last commit message, or want to change it, you can do so with:
git commit --amendFetching remote code with git pull
If someone else has worked on the code and pushed it to the remote server, you can retrieve their work with:
git pullFrom GitLab, I added a file called salut.md. Here’s the result:
remote: Enumerating objects: 4, done.
remote: Counting objects: 100% (4/4), done.
remote: Compressing objects: 100% (2/2), done.
remote: Total 3 (delta 0), reused 0 (delta 0), pack-reused 0
Unpacking objects: 100% (3/3), 299 bytes | 299.00 KiB/s, done.
From gitlab.com:thibault/article_safecode
   ab19447..2509b9f  master     -> origin/master
Updating ab19447..2509b9f
Fast-forward
 salut.md | 1 +
 1 file changed, 1 insertion(+)
 create mode 100644 salut.md
Sending your code with git push
Once your files are committed, you can push your code to GitLab with:
git push

Enumerating objects: 3, done.
Counting objects: 100% (3/3), done.
Delta compression using up to 4 threads
Compressing objects: 100% (2/2), done.
Writing objects: 100% (2/2), 258 bytes | 258.00 KiB/s, done.
Total 2 (delta 0), reused 0 (delta 0)
To gitlab.com:thibault/article_safecode.git
   c3a3b79..a801f8e  master -> master
What is .gitignore?
The .gitignore file is where you list the paths of all the files you don’t want to version. These files will never reach GitLab, and your colleagues will never have access to them.
This file is very handy. If you use an IDE such as Visual Studio Code or PhpStorm, it generates files specific to your editor setup, which you don’t always want to version.
Similarly, if you install dependencies, there’s no need to version the ./vendor folder.
This file should be present in every versioned project. Fortunately, you can also set a global configuration, since some rules apply to every project. For example, on a Mac you don’t want to version the .DS_Store file, which stores folder display options, icon positions and other visual settings.
To do so, run:
# On Linux, Mac and Git Bash for Windows:
git config --global core.excludesfile ~/.gitignore
# On Windows:
git config --global core.excludesfile "%USERPROFILE%\.gitignore"
You can find this path at any time with:
git config --global core.excludesFileNow you can edit it (with vim, for instance) and add the global rule, continuing with my earlier example:
vim ~/.gitignore# Global gitignore
.DS_StoreBranches
Let’s pause the list of useful commands to explain the concept of branches.
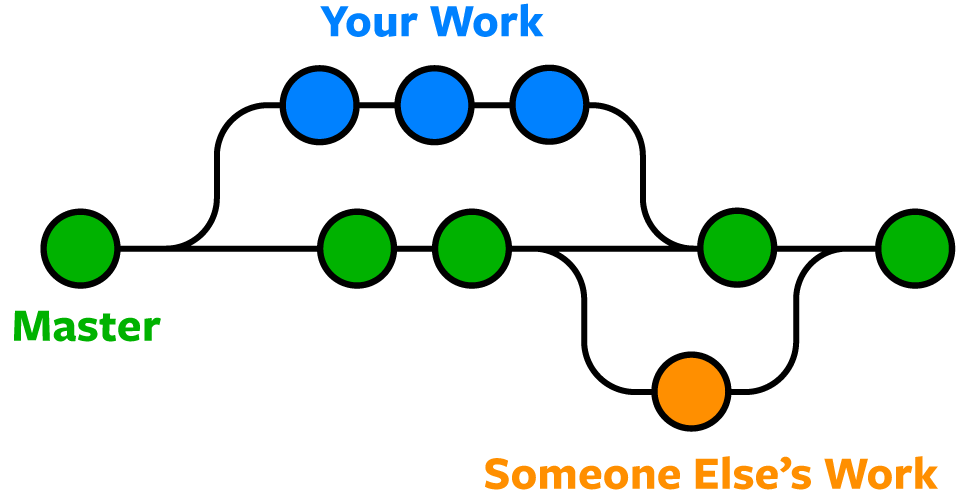
So far, everything you’ve done is on the MASTER branch, shown in green. You may have spotted the word master in the output of some commands.
It’s the branch created by default.
To understand why branches are useful, let me set the scene:
You join a new company that builds websites. Each site is versioned in its own repository. Your first task is to add a video conferencing feature to one of them, but another employee has been working on a redesign for three days. Fortunately, they created a new branch from master, the stable version of the code.
You’ll do the same, branching off master to start from a clean code base. Once your feature is finished, you can merge your branch into master, i.e. your branch rejoins the master branch (see diagram).
Listing branches with git branch
To see the existing branches, use:
$ git branch
* master
I get a list of branches (just one here), with an asterisk showing which branch I’m on.
Creating a branch with git checkout -b
To create a new branch, type:
$ git checkout -b my_new_branch
Switched to a new branch 'my_new_branch'
The -b parameter creates a new branch.
Now git branch shows:
$ git branch
* my_new_branch
  master
So I’ve created a branch called ‘my_new_branch’ and switched to it.
Switching branches with git checkout
We saw that git checkout -b creates a branch and switches to it. That makes sense, since switching is checkout’s primary purpose.
To go back to master, I just specify it:
$ git checkout master
Switched to branch 'master'
Your branch is up to date with 'origin/master'.
Temporarily saving your work with git stash
Back to our website example to show why this is useful. You’ve made lots of changes on your branch and pushed the new features that work, to save your progress. The project manager comes over to see them in your development environment, but you’re in the middle of building other features that currently break the earlier ones.
The git stash command saves your changes and sets them aside.
Here, the work in progress is my bye_bye.txt file.
$ git status
On branch master
Your branch is up to date with 'origin/master'.

Changes not staged for commit:
  (use "git add <file>..." to update what will be committed)
  (use "git restore <file>..." to discard changes in working directory)
	modified:   bye_bye.txt

no changes added to commit (use "git add" and/or "git commit -a")
If I run git stash:
$ git stash
Saved working directory and index state WIP on master: 2509b9f Update salut.md
If I run git status again:
On branch master
Your branch is up to date with 'origin/master'.

nothing to commit, working tree clean
My changes no longer appear.
Restoring stashed work with git stash apply
Once the project manager has seen the new features, I can restore my files with git stash apply.
$ git stash apply
On branch master
Your branch is up to date with 'origin/master'.

Changes not staged for commit:
  (use "git add <file>..." to update what will be committed)
  (use "git restore <file>..." to discard changes in working directory)
	modified:   bye_bye.txt

no changes added to commit (use "git add" and/or "git commit -a")
The command also runs a git status to show me the file has been restored.
Conclusion
This article is getting long, and the aim isn’t to list every command and parameter. My first goal was to show you why Git matters in a collaborative project, giving you the basic commands so you can start having fun with this great tool.
My second goal was to show how powerful and necessary it is for securing, backing up and tracking the history of your code. Used properly, it’s a tool that contributes to IT security. Just be careful never to push passwords, API keys and the like! Secrets exposed in public tools are easy pickings, as Postmaniac shows with Postman workspaces.

Leave a Reply